| Date tip published: | 03/01/2012 |
| Description: | Domino Designer 8.5.3 added several very nice features for XPages developers. This tip covers how to customize the controls that appear on the Controls palette. This ability is one of the new additions in Domino Designer 8.5.3. |
To learn more about XPages use the following links:
Developing XPages using Domino Designer 8.5
XPages Development 2 for Notes and Domino 8.5
JavaScript for XPages Development (8.5)
Mobile XPages Development for Domino 8.5
 Customizing The Controls Palette Customizing The Controls Palette
By default, the Controls palette is located on the right side of Domino Designer. Controls are organized into categories (also referred to as "drawers") based on their type.
The control categories/drawers are:
- Core Controls - the basic Web controls used to build a user interface.
- Container Controls - controls that hold other controls, such as a Table control.
- Custom Controls - reusable custom controls that are added to the application by a Domino developer. This category is not displayed in the Controls palette until after the first Custom Control is added to the application.
- User Added Controls - these "Other Controls" are added to the palette by selecting from the Domino Designer\Palette page in the Preferences dialog.
As of Designer 8.5.3, "Palette Profiles" are used to customize the display of controls in the Controls palette. Different palette profiles can be created and configured to include drawers and controls for different types of work.
Procedure: Create and Customize Palette Profiles
Follow these steps to use the Palette Profile preferences for customizing the display of the Controls palette:
- Do one of the following In Domino Designer:
- Right click in the Controls palette and choose Customize Palette... from the context menu.
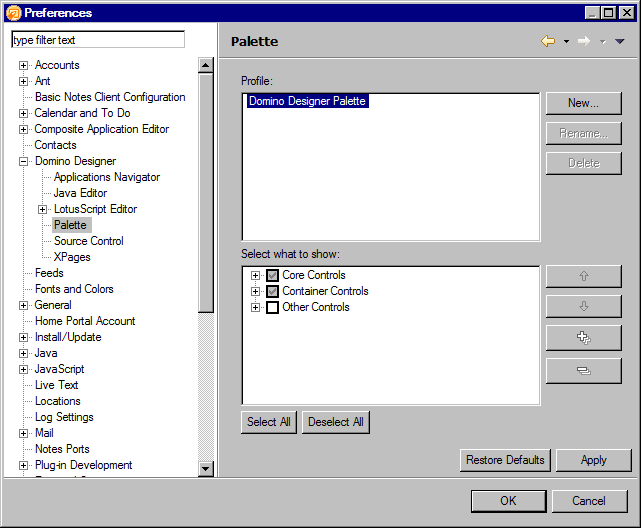
- Choose File | Preferences from the menu to open the Preferences dialog. In the left navigator expand Domino Designer and click on Palette to open the Palette Profiles interface shown in the image below.

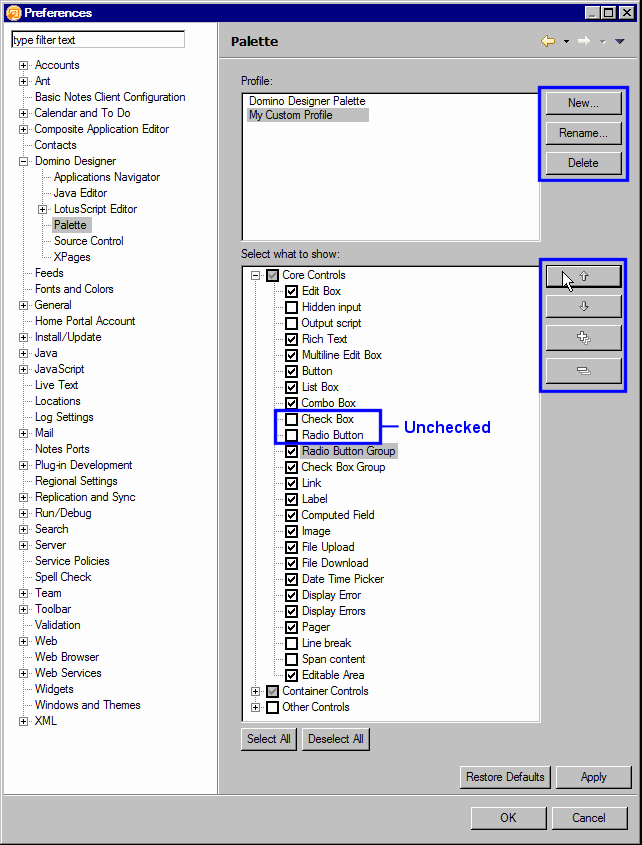
- By default the "Domino Designer Palette" profile will be created which contains the current state of the palette when Designer is first launched. You can choose to customize this existing profile or use the [New] button to create multiple palette profiles with varying control palette layouts. The image below shows the creation of a "My Custom Profile" palette profile. You can then check or uncheck palette drawers and/or individual controls within them that you wish to show or hide for the selected palette profile. For example, this image shows the expanded Core Controls drawer with the 'Check Box' and 'Radio Button' controls unchecked. To change the order of the control drawers and/or individual controls, select the control/drawer and then click the Up or Down arrows highlighted below. Use the [Rename] and [Delete] buttons to rename or delete the selected profile.

Finally, click [Apply] to save the changes and then [OK] to close the dialog and switch to the selected palette profile in Designer.
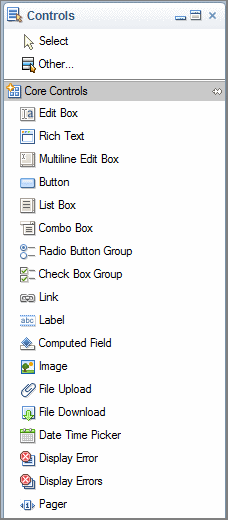
- The image below shows the Controls palette now displayed with the saved customization from the "My Custom Profile" palette profile created in the previous step.

You can also switch profiles directly from the Designer interface. Right-click anywhere in the Controls palette and select Palette Profiles | Profile name from the context menu as shown in the image below. |